
Introduction
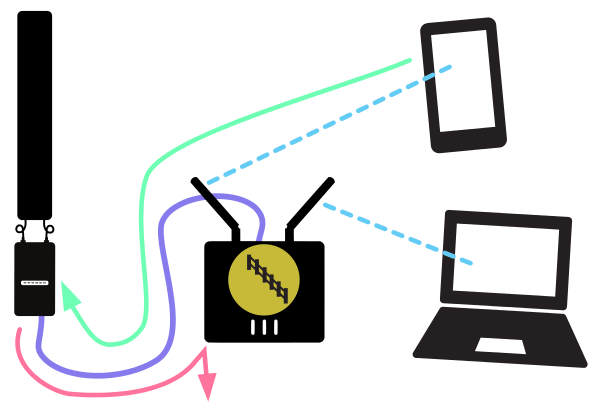
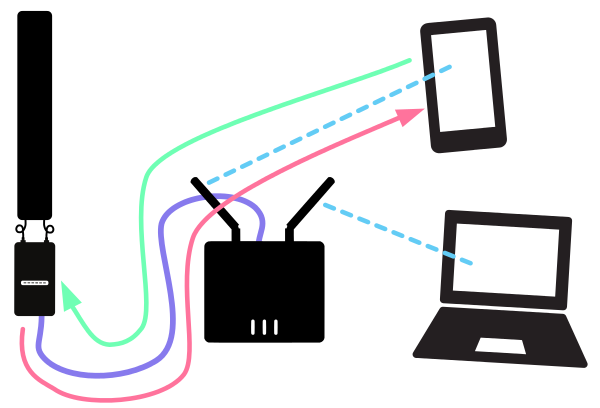
When designing a community wireless network, it helps to separate your rooftop mesh routers from the Access Points (APs) people connect to. In the diagram above, the rooftop routers have antennas that are designed to connect long distances, from rooftop to rooftop. The Access Points are closer to the ground, and have antennas that only connect to people’s Wi-Fi devices within a smaller area. This better matches the range of the mobile phones and laptops that people use most often.
You can read more about this type of network design in Guidelines for Mesh Networks, in the section titled “Every router should do just one thing”.
If you want to skip straight to the configurations, select here:
- Router using NAT - with default firmware
- Router using NAT - with Commotion
- Router as a pass-through - with default firmware
- Router as a pass-through - with Commotion
Note: This guide is written for networks that are using single-radio or single-band Wi-Fi devices for the rooftop routers. If you are using dual-radio or dual-band Wi-Fi routers, you can skip to the end of the document and read the Dual-radio or Dual-band routers section.
Access Point options
Once your long-distance rooftop routers are setup and working well, you can add Access Points indoors or outdoors where people want to use the network. You will need to make a decision before configuring your APs: Should users on the Access Points use a firewall, or should everyone connecting be a full member of the mesh?
Access Points with NAT
If you want a bit of extra protection for the users on your network, you should set up your Access Points as basic routers. This would allow people on the network to connect to your local servers, or to the Internet. It would also prevent any other users on the network from being able to communicate directly with their devices.
In some cases, you may want users to be able to share files across the network, or set up a temporary chat or web server. This is much more difficult in this setup.
When a router is set up this way, it has the following configuration:
- Provides IP addresses - Using DHCP, the Access Point will provide an IP address to devices that connect, in a private range. This usually looks like 192.168.1.x, and won’t be accessible from the rest of the mesh network.
- Network Address Translation (NAT)- Since the IP addresses are private, the Access Point will have to “translate” between the IP all the people connecting are using, and the IP address it was given by the mesh router.
- Firewall - The Access Point will prevent any connections from the rest of the network from connecting to the users behind the NAT. If a person connects to something on the network or the Internet, that data will be allowed through, but everything else will be blocked.
Access Points as a pass-through
If you want everyone connecting to the network to have full access, with no firewalls, you should set up your access points to pass-through from the mesh router. This will allow people on the network to connect to any local servers, to the Internet, or provide local servers themselves.
When a router is set up this way, it has the following configuration:
- Does not provide IP addresses - DHCP should be turned off. Anyone connecting to the AP will get IP addresses from the mesh router. When using Commotion on the mesh router, this will provide people’s devices with an IP in the range 10.x.y.z.
- No Network Address Translation (NAT) - Everyone connecting to the AP has an IP from the mesh router, so there is no additional translation needed.
- Firewall - The mesh router will have a firewall controlling connections on the mesh. It will still provide protection from any unwanted connections on the Internet from accessing people’s devices on the network. It will allow all users on the network to access each other directly.
Mix and match
Note that you don’t have to use the same setup everywhere on the network. Some people or organizations on the network may want their users to be directly connected to the mesh, or they may want an additional firewall. You can use either configuration anywhere on the network.
Access Point Configurations
Below there are four options for setting up your access points. The first two options use NAT, and have the option of using the default firmware or Commotion on a router. The second options use the router as a pass-through, and can either use the default firmware or Commotion.
Router using NAT
Both configurations described below use the hardware setup shown here:
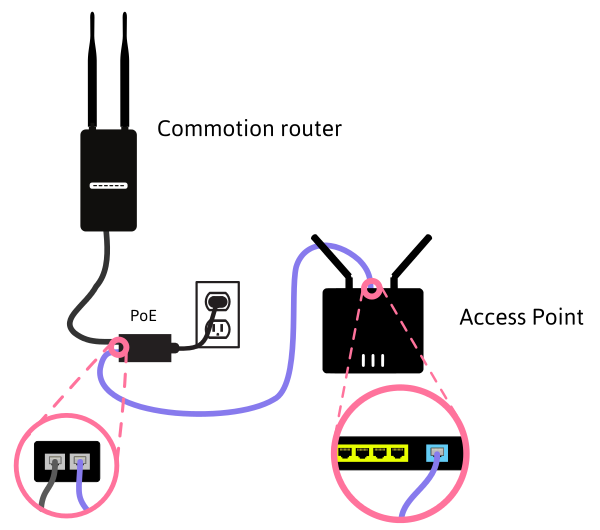
- The Commotion router is configured to always provide DHCP on the WAN port, and has the AP disabled or removed.
- The Access Point router is configured with default settings, and has the cable from the Commotion router plugged into the blue WAN port.
Router using NAT with default firmware
There are many, many options for Access Points out there. This guide cannot cover them all, so instead it will just show the options for configuring TP-Link routers and Access Points. Other router manufacturer’s menus will look similar.
To setup the router with NAT, using a default firmware, just plug in the cable from the Commotion router to the blue WAN port. If there is only one port (regardless of what it is named), plug it in there. The WAN port may be another color, such as yellow or red.
First, Set the Admin password - Default passwords are easy to guess, and can lead to security issues. Set the administrator password to something strong, but easy for your maintainers to remember.
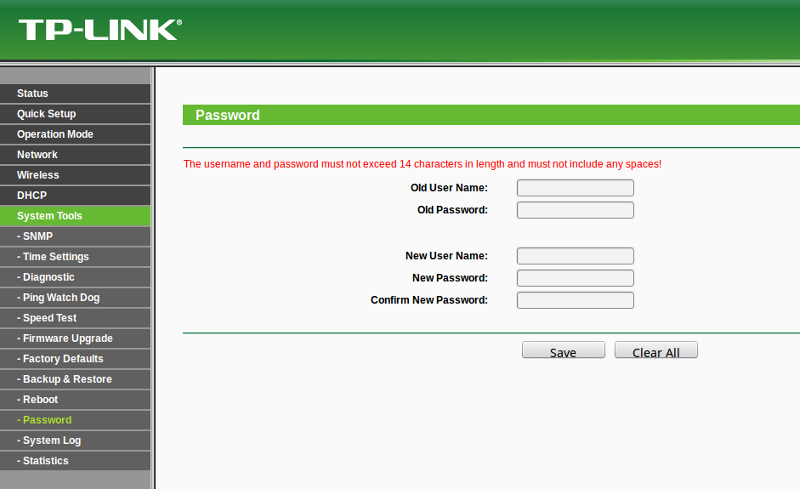
Second, Name the Access Point SSID - This is what people see on their Wi-Fi devices when they want to connect. Make it something recognizable so everyone knows it is an AP for the community network.

The rest of the settings on the AP you can leave as default. It should now be ready to use as an Access Point.
Router using NAT with Commotion firmware
If you have any router with the Commotion firmware installed, you can set it up as a simple AP. It requires a number of configuration changes, since Commotion is setup to do many different things by default. Plug in the cable from the meshing Commotion router into the blue WAN port. If there is only one port, (regardless of what it is named), plug it in there. The WAN port may be another color, such as yellow or red.
First, Configure Commotion with the Setup Wizard - You must first run through the Commotion setup wizard, as though you were using the router as a mesh neighbor. Name the Access Point something recognizable so everyone knows it is an AP for the community network.
Second, Remove the Wireless Mesh connection - Go to Basic Configuration -> Network Settings -> Mesh Network. Hit the “Delete” button on the right side of the screen, then “Save and Apply”. Confirm the changes.

Third, Remove the Gateway test script - Go to Advanced -> System -> Scheduled Tasks.
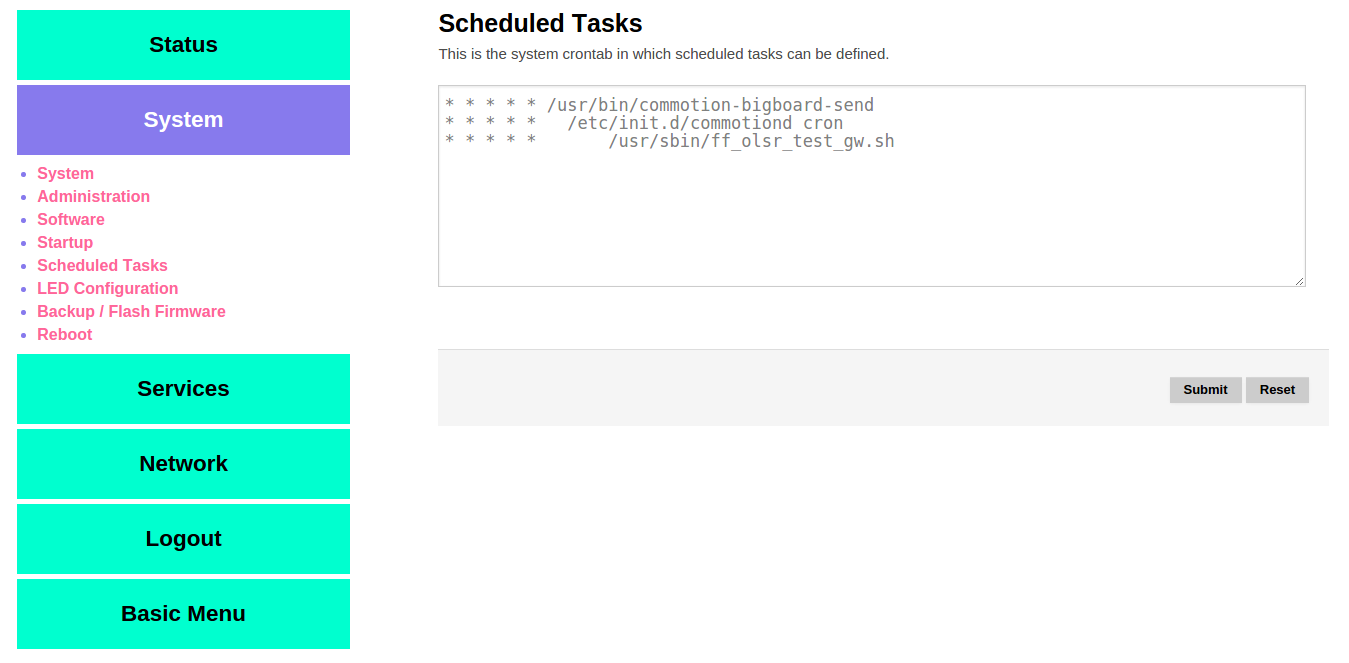 Remove the line in the text box that looks like:
* * * * * /usr/sbin/ff_olsr_test_gw.sh
Hit “Submit”. The page should now look like this:
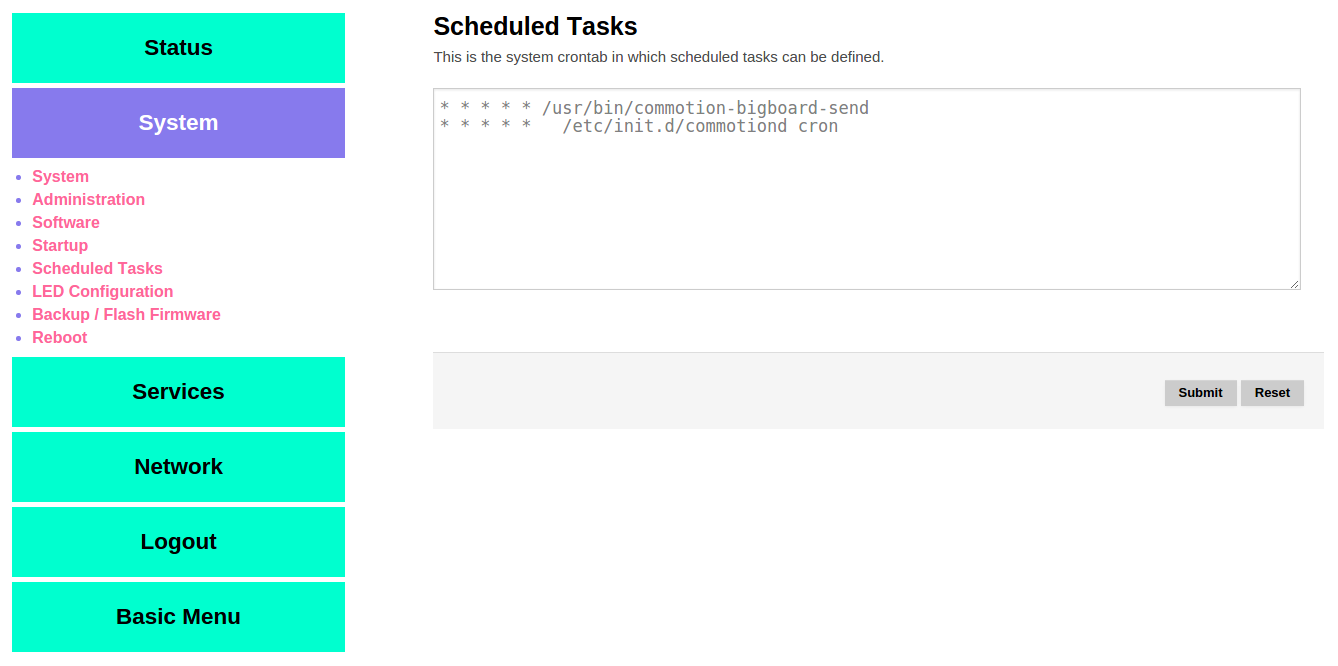
Reboot the Commotion router. It should now be ready to use as an Access Point.
Router as a pass-through
Both configurations described below use the hardware setup shown here:

- The Commotion router is configured to always provide DHCP on the WAN port, and has the AP disabled or removed.
- The Access Point router is configured to have DHCP off, and has the cable from the Commotion router plugged in the yellow LAN port. The blue WAN port is not used.
Router as pass-through with default firmware
To setup the router with as a pass-through (also known as an AP bridge), using a default firmware, just plug in the cable from the Commotion router to the yellow LAN port. If there is only one port (regardless of what it is named), plug it in there. The LAN ports may be another color, such as white or black.
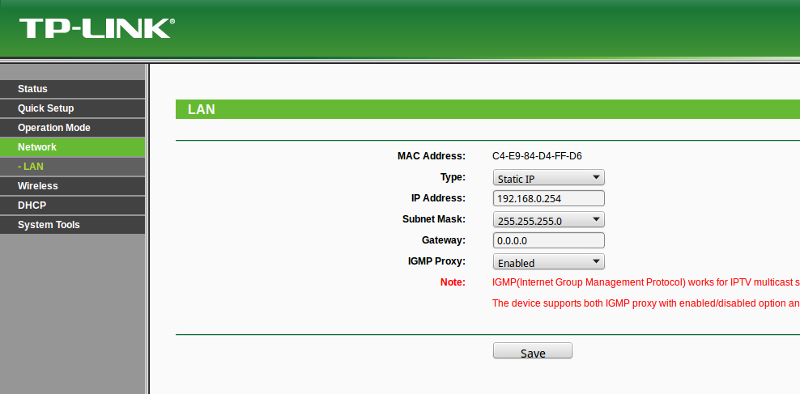
First, Set a Static IP on the LAN port - Since the AP router won’t give out IP addresses after you disable DHCP, set this IP so the router’s Administrator interface will be accessible in the future. It is recommended to label the AP with this static IP so you don’t forget it.
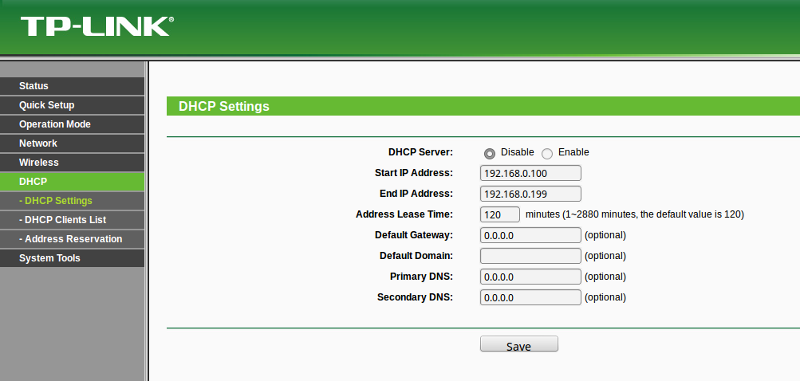
Second, Disable DHCP on the LAN - Since the Commotion router will be handing out IP addresses with DHCP, you don’t need a second DHCP server on the router. Having two DHCP servers can lead to unexpected results, and often things will not work correctly.
Third, Set the Admin password - Default passwords are easy to guess, and can lead to security issues. Set the administrator password to something strong, but easy for your maintainers to remember.
Fourth, Name the Access Point SSID - This is what people see on their Wi-Fi devices when they want to connect. Make it something recognizable so everyone knows it is an AP for the community network.
The rest of the settings on the AP you can leave as default. It should now be ready to use as an Access Point.
Router as pass-through with Commotion firmware
If you have any router with the Commotion firmware installed, you can set it up as a simple AP without NAT. It requires a number of configuration changes, since Commotion is setup to do many different things by default. Plug in the cable from the meshing Commotion router into the yellow LAN port. If there is only one port, (regardless of what it is named), plug it in there. The LAN port(s) may be another color, such as black or white.
First, Configure Commotion with the Setup Wizard - You must first run through the Commotion setup wizard, as though you were using the router as a mesh neighbor. Name the Access Point something recognizable so everyone knows it is an AP for the community network.
Second, Remove the Wireless Mesh connection - Go to Basic Configuration -> Network Settings -> Mesh Network. Hit the “Delete” button on the right side of the screen, then “Save and Apply”. Confirm the changes.
Third, Set a Static IP on the LAN port - Since the meshing Commotion router will be handing out IP addresses with DHCP, you don’t need a second DHCP server on the router. Having two DHCP servers can lead to unexpected results, and often things will not work correctly. Go to Advanced -> Network -> Interfaces and click “Edit” in the row next to “LAN”.
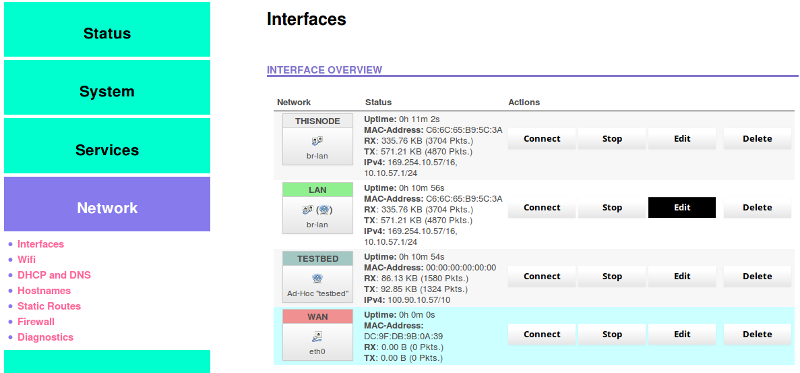
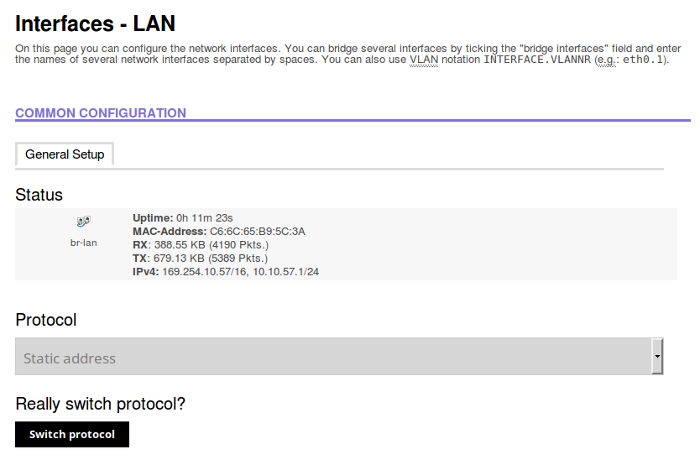
Under “Protocol”, select “Static Address” in the pull down menu, then click “Switch Protocol”. Confirm that you really want to switch the protocol.
Enter the static IP you want to use in the future to access the LAN on the Access Point.
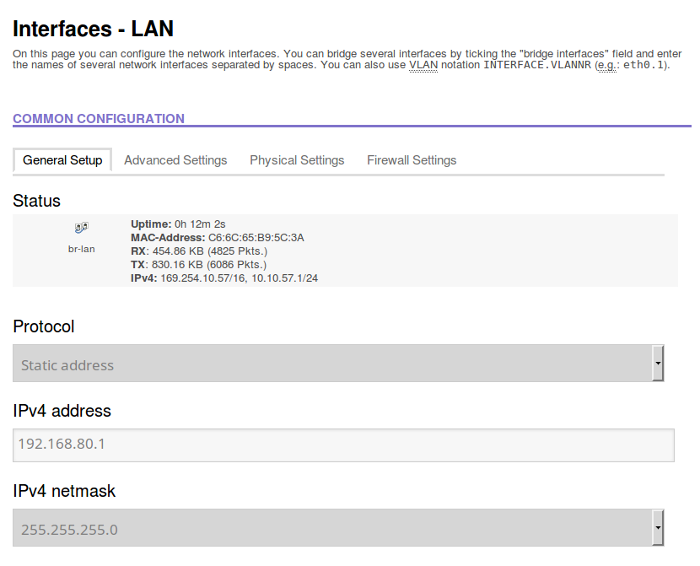 This will be important if you need to do any maintenance or change settings on the AP. It is recommended to label the AP with the static IP address so you don’t forget it in the future.
Next, Disable DHCP on the LAN port(s) - Go to Advanced -> System -> Startup.
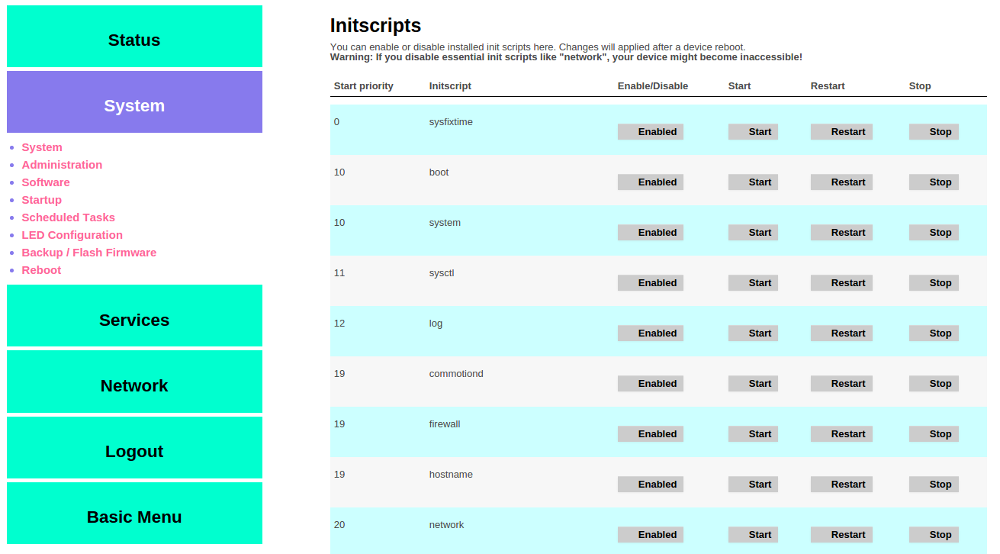
Scroll down until you see “dnsmasq”, then click the button labeled “Enabled”. This will toggle it to “Disabled”.
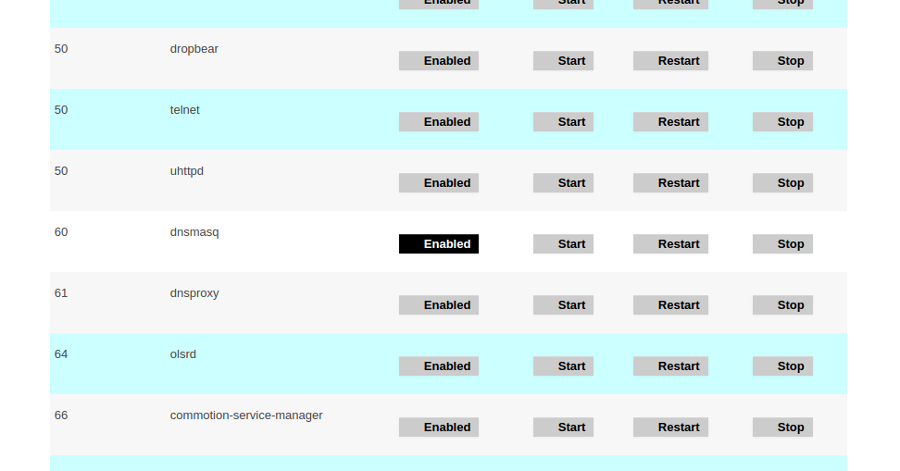
Finally, reboot the router. It should now be ready to use as an Access Point.
Dual-radio or Dual-band routers
Some Wi-Fi routers and Access Points are dual-band, or dual-radio. This gives these devices additional capabilities and options for mesh and AP connections.
Dual Band
Dual-band Wi-Fi devices can use both common Wi-Fi frequency bands - 2.4GHz and 5GHz. Most older smartphones and laptops support only 2.4GHz, and nearly every AP and router available today provides 2.4GHz access because of this. Newer smartphones and laptops also can access Wi-Fi routers on 5GHz channels.
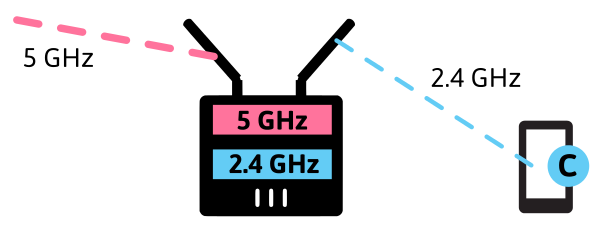 Dual-band Wi-Fi router using the 5GHz band for Mesh connections, and the 2.4GHz band for connections to users
Dual Radio
Even a dual-band Wi-Fi device can only transmit and receive signals on a single channel in a band - for instance channel 11 on the 2.4GHz band, or channel 40 on the 5GHz band. Dual-radio devices have a second set of transmitters and receivers that allow operation on two Wi-Fi channels in the same band - for instance channel 1 and 11 on the 2.4GHz band, or channel 40 and 148 on the 5GHz band. These two radios can often be set to separate bands as well, allowing the router to operate as a dual-band device.
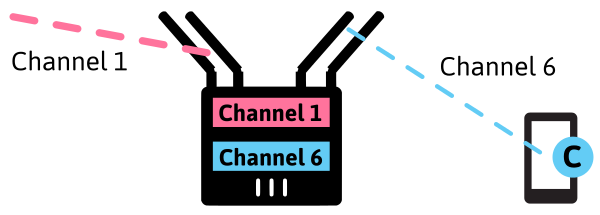 Dual-radio Wi-Fi router using channel 1 on the 2.4GHz band for Mesh connections, and channel 6 on the 2.4GHz band for connections to users
Using Dual-band or Dual-radio devices
If you are using dual-radio or dual-band Wi-Fi routers to build your community wireless network, you have the option of combining the functions of two routers into one. Since the two functions can happen simultaneously, there is significantly less or no performance loss.
The only challenge with using a single device for both neighborhood mesh connections and an Access Point is placement: routers used for mesh links should be placed high to reach further, routers used for Access Points should be placed lower to reach people. This can be overcome somewhat with a creative use of directional antennas.
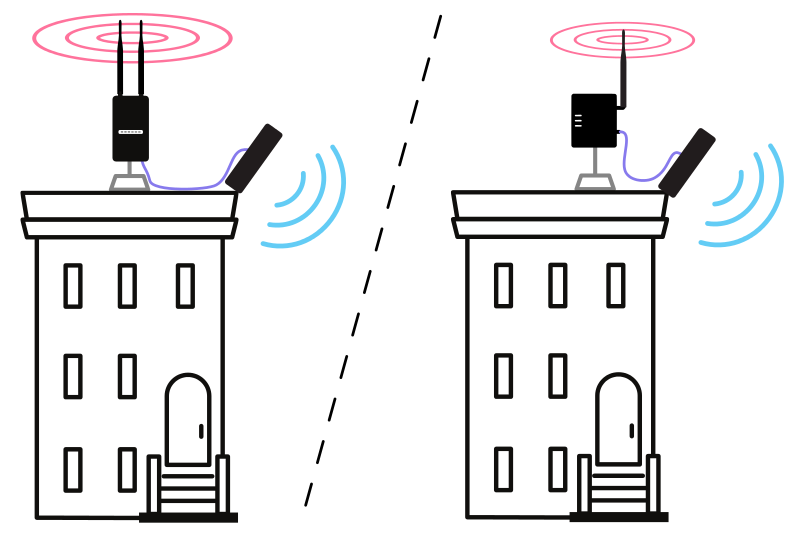
In the diagram above, you have dual-band or dual-radio routers that are providing an omnidirectional (all-around) wireless signal for mesh connections. There is also an external directional antenna providing a Wi-Fi access point to an area on the ground around the building. The directional antenna provides a more focused signal, as well as allows the Access Point to better pick up the signals from laptops and smartphones on the ground.
This concept is explored further in the blog post Do it yourself antennas for Community Networks.